Tabela de Conteúdos
3.3.1 Web Cache: Squid3
Σκοπός
Να εγκαταστήσουμε το Squid3, που είναι κρυφή μνήμη(cache) διαδικτύου.
Το squid3 είναι ένα πακέτο λογισμικού proxy που λειτουργεί ως web cache: Αποθηκεύει web αιτήματα απο τους πελάτες και εξυπηρετεί μελλοντικά αιτήματα. Αυτό επιταχύνει την περιήγηση στο διαδίκτυο, με τη μείωση του χρόνου πρόσβασης, καθώς και την κατανάλωση εύρους ζώνης.
Εγκατάσταση
root@server:~# aptitude install squid3
Ρύθμιση
Οι ρυθμίσεις για το squid3 βρίσκονται στο αρχείο /etc/squid3/squid.conf.
Η προεπιλεγμένη πύλη του squid3 είναι η 3128, αλλά αυτό μπορεί να αλλάξει( η 8080 είναι πολύ συνηθισμένο να χρησιμοποιηθεί για web caching):
- /etc/squid3/squid.conf
#[...]

# Squid normally listens to port 3128
http_port 3128

#[...]
Για λόγους ασφαλείας, το squid3 θα δέχεται συνδέσεις μόνο από το τοπικό δίκτυο ή από τον ίδιο το διακομιστή. Αυτό επιτυγχάνεται χρησιμοποιώντας έναν κατάλογο access control list (ACL) (acl home.lan src 192.168.1.0/24) επιτρέποντας την πρόσβαση μόνο τα συστήματα που ανήκουν στον εν λόγω κατάλογο(*http_access allow home.lan**):
Το τοπικό δίκτυο ορίζεται με το acl tag:
- /etc/squid3/squid.conf
# [...]

#  TAG: acl
#       Defining an Access List

# [...]

#Default:
# acl all src all
#
#
# Recommended minimum configuration:
#
acl manager proto cache_object
acl localhost src 127.0.0.1/32 ::1
acl to_localhost dst 127.0.0.0/8 0.0.0.0/32 ::1

# Example rule allowing access from your local networks.
# Adapt to list your (internal) IP networks from where browsing
# should be allowed
#acl localnet src 10.0.0.0/8    # RFC1918 possible internal network
#acl localnet src 172.16.0.0/12 # RFC1918 possible internal network
#acl localnet src 192.168.0.0/16        # RFC1918 possible internal network
#acl localnet src fc00::/7       # RFC 4193 local private network range
#acl localnet src fe80::/10      # RFC 4291 link-local (directly plugged) machines

acl home.lan src 192.168.1.0/24

# [...]
Ορισμός ελέγχου πρόσβασης http_access tag:
- /etc/squid3/squid.conf
# [...]

#
# INSERT YOUR OWN RULE(S) HERE TO ALLOW ACCESS FROM YOUR CLIENTS
#

# Example rule allowing access from your local networks.
# Adapt localnet in the ACL section to list your (internal) IP networks
# from where browsing should be allowed
#http_access allow localnet

http_access allow home.lan

http_access allow localhost

# And finally deny all other access to this proxy
http_access deny all

# [...]
Το μέγεθος της cache μπορεί επίσης να αλλάξει:
- /etc/squid3/squid.conf
# [...]

# Uncomment and adjust the following to add a disk cache directory.
cache_dir ufs /var/spool/squid3 2048 16 256

# [...]
Το ορατό όνομα του proxy μπορεί να οριστεί επίσης:
- /etc/squid3/squid.conf
# [...]

#  TAG: visible_hostname
#       If you want to present a special hostname in error messages, etc,
#       define this.  Otherwise, the return value of gethostname()
#       will be used. If you have multiple caches in a cluster and
#       get errors about IP-forwarding you must set them to have individual
#       names with this setting.
#Default:
# visible_hostname localhost
visible_hostname proxy.home.lan

# [...]
Προαιρετικά, το μέγεθος τον αντικειμένων που αποθηκεύοντε στην cache, μπορεί να αλλξει:
- /etc/squid3/squid.conf
# [...]

#  TAG: maximum_object_size     (bytes)
#       Objects larger than this size will NOT be saved on disk.  The
#       value is specified in kilobytes, and the default is 4MB.  If
#       you wish to get a high BYTES hit ratio, you should probably
#       increase this (one 32 MB object hit counts for 3200 10KB
#       hits).  If you wish to increase speed more than your want to
#       save bandwidth you should leave this low.
#
#       NOTE: if using the LFUDA replacement policy you should increase
#       this value to maximize the byte hit rate improvement of LFUDA!
#       See replacement_policy below for a discussion of this policy.
#Default:
# maximum_object_size 4096 KB
maximum_object_size 20480 KB

# [...]
Επανεκκινήστε το squid3:
root@server:~# /etc/init.d/squid3 restart
Ρύθμιση πελάτη
Web browsers
Απο την πλευρά του πελάτη απλά ρυθμίστε τον browser να χρησιμοποιεί το νέο σας proxy server.
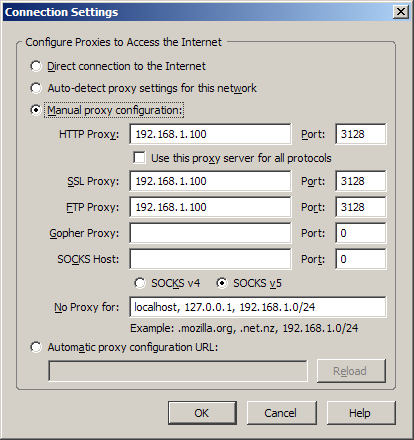
Στον Firefox, στο μενού, επιλέξτε Tools → Options, μετά Advanced, επιλέξτε το Network tab και πατήστε το Settings. Επιλέξτε Manual proxy configuration και εισάγετε την διευθηνση του proxy (192.168.1.100) και τον αριθό της πύλης(3128).
Linux systems
Στα συστήματα, απλά εξάγετε την μεταβλητή http_proxy με το URL του proxy:
fribeiro@server:~$ export http_proxy="http://192.168.1.100:3128/"
Μια μόνιμη μέθοδος συνίσταται στον καθορισμό της μεταβλητής στο προσωπικό προφίλ χρήστη:
fribeiro@server:~$ echo 'http_proxy="http://192.168.1.100:3128/"' >> ~/.profile
Η μεταβλητή http_proxy πρέπει επίσης να οριστεί στο προφιλ του συστήματος /etc/profiles:
root@server:~# echo 'http_proxy="http://192.168.1.100:3128/"' >> /etc/profile
Το ίδιο ισχύει και για τη μεταβλητή ftp_proxy, Που χρησιμοποιουμε για να ορίσουμε proxy στις FTP συνδέσεις.
Αναφορές
- Wikipedia: Proxy Server (http://en.wikipedia.org/wiki/Proxy_Server)
- Wikipedia: Cache (http://en.wikipedia.org/wiki/Cache)
- Squid Web Proxy Cache (http://www.squid-cache.org/)

~~DISCUSSION~~